Styler: Checkout and Receipts
How to use Styler
Introduction
There are two types of Checkout Forms within the Merchant Portal. One is Modal and the other is Hosted. The best way to describe these is that a Modal form is one that overlays a small data collection box over the top of a site page (similar to how a hidden menu works on a web page). The user interfaces with the data collection box and clicks on the submit button and the form closes. A Hosted form is when the consumer is redirected to a payment page (i.e. the QorCommerce checkout server).
Within Styler we have payment forms and receipts. A Form is a payment form to securely collect payment data from the consumer. The other is a Receipt and it allows you to create payment receipts that can be automatically emailed to the consumer by the Merchant Portal when a payment has been completed.
Forms
Forms are special layouts with your company logo, name, address and information about an order (OrderID, Amount, Sub-Details, etc) plus a pre-configured ‘Approve For Payment’ button that can be customized for size, color and wording.
Once you create a ‘payment form’, you can go into ‘Virtual Terminal – PayLinqs’ and create a payment link for the consumer to pay you online - the link and instructions are automatically emailed or texted (Text&Pay) to them. The consumer clicks on the pay now button and is directed from the email or sms to a payment form, the consumer fills in the payment information, clicks pay and the transaction is automatically processed by QorCommerce.
Note:When you are configuring any form, make sure you save your work by clicking on the Update button that will be in the upper right of the form configuration page.
When you click on the Checkout (hosted & modals) menu item you will see the following page:

In the ‘Form Templates List’, the form rows are scrollable left and right. If you can not see the following buttons then scroll to the right end of the row:

- The ‘Trash’ will permanently delete the selected row.
- The ‘Key’ presents the HTML tag with a specific secure key you can use in the form. The ‘Regenerate’ button lets you create a new key, if necessary. And the Close button to quit this modal form.

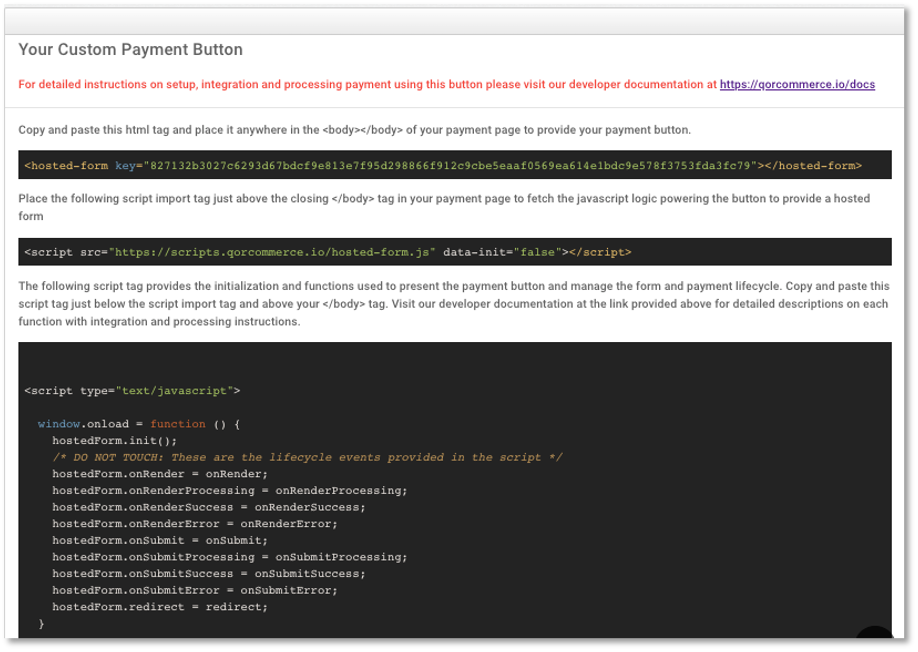
- The ‘<…>’ generates the code necessary for the Custom Payment Button on the PayLinq eMail and lets you manage the payment lifecycle. If you would like documentation on the code presented, please refer to the QorCommerce API Documentation.
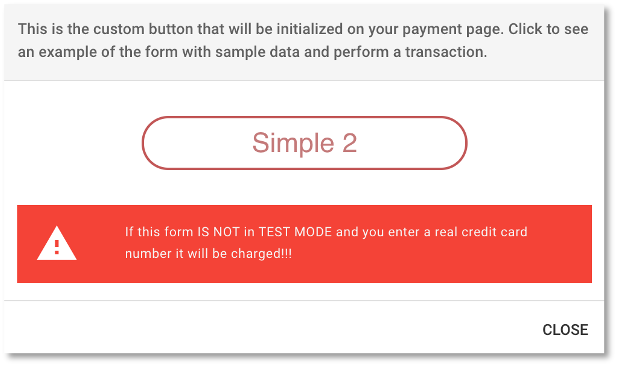
- The ‘Eye’ brings up a sample of the Payment Button the above Custom Payment Button Code generates.
Note:This button is live, so if you click the button and enter a credit card number and the form is in ‘Active’ mode, it will attempt to process a live transaction. Make sure to keep the form in ‘Test’ mode if you need to test the functionality of the button. You set the mode in the following section at the bottom called ‘Payment Button’.
Here are some additional payment buttons you may want to use, you can easily copy and paste any of these into your html, payment form. Or just style your button with these ideas.
- The ‘Pencil’ lets you edit the Payment Form. You are presented with a Forms Management Control Window. This is where you can set the form to Test mode or Live mode. In test mode, no transactions will be processed, so make sure you move the mode to live after you have finished configuring and testing the form.

Form Detail and MID
- Set Mode: Sets the form in ‘Test’ or ‘Live’ mode
- Hosted Form Name: Lets you enter a custom form name
- Merchant Account (MID): Lets you select the MID on which to process this form’s transactions (typically you will only have one MID)
- Contact Info: The next section displays the your business contact information. If this is incorrect , you will need to call QorCommerce Customer Service to correct any errors.
- Email Receipts: Allows you to enable the emailing of the receipt to the consumer after the transaction is processed.
- Domain / Website: You set your business website URL here
- Title or Greeting: You can configure a custom greeting
- Company Logo Link: You can set a link to your logo image. Please be sure to test this before proceeding to production to be sure your logo image is of the proper size in proportion to the emailed receipt
Form Template
In this section there are samples of form templates from the QorCommerce library are for you to choose one to use in your PayLinq form.

Settings and Options
This is where you turn on and off all the various elements within the receipt.

Terms of Service, Privacy and Refund Policies
This section allows you to set up the policies on the receipt by linking buttons on the receipt to a hosted webpage for each policy; Terms of Service, Privacy and Refund.

Each of the three sections have the same options to turn on and off each policy and a place to enter the web URL of the hosted policy pages or to create a markup language policy (example below) to be displayed as a pop-up on the screen.

Link to terms of Service Policy:

Create your own Markdown Policy:

Redirects and Webhooks
These options apply to Approved, Declined or Error Responses when using the online checkout forms.

A Redirect is when the response to the payment is redirected to a webpage/template that you have setup on your servers or within your shopping cart. In order to use this function, you need to enter redirect URLs.
A Webhook is when the response to the payment is sent with transaction data (JSON) to a system that you own and your system processes that information accordingly.
- Approved Transactions (Redirect and Webhook)
In the example below, when a transaction is approved you can redirect the consumer back to a webpage of your choosing.
To have a redirect, provide a valid URL you would like us to redirect the customer to after an ‘Approved’ payment is completed. If you leave this value empty the hosted form browser window or tab will simple close when the customer completes their transaction.
To have an ‘Approved’ webhooks, you must ‘Enable Webhooks’ by clicking on the slider switch.
If you enable and provide an endpoint with an optional key/secret to receive you will received the full transaction data that include the request we receive, the response including the host data and, if enabled, any customer input like emails and phone numbers. And we will push this to you as a JSON response using ‘GET or POST’ (your choice
- Declined Transactions (Redirect and Webhook)
- Errors (Redirect and Webhook)
Both of these types work exactly like the Approved Redirects and Webhook with the same options and methods.
The Redirects and Webhooks page example is on the following page:

Payment Button
This sets the text, style, color, shape, size and decoration of the ‘Payment Button’ – all the options are below the button example.

We quickly went through the options and designed a payment button. The final result appears right in place so you can be sure of how it will look in the email.

Note:When you are finished configuring your redirects and/or webhooks, remember to click on the Update button to save your work.
Receipts
Receipts are a form that is returned to the consumer following a payment attempt. A receipt contains the details of the purchase, amount and transaction ID. Receipt forms are not interactive like Payment forms. A receipt should contain the email address or phone number of your customer service department in case the customer needs to contact you about their order. This helps reduce refunds and disputed payments.
When you click on Receipts in the left side menu you will see the following page:

On the right of each form row are the Actions buttons:
Note:When you are in the form configurator if you make any changes make sure you click on the Update button in the upper right to save your work.
- The ‘Paper Airplane’ brings up a test box to let you test the emailing of the receipt to see exactly what the consumer will see.
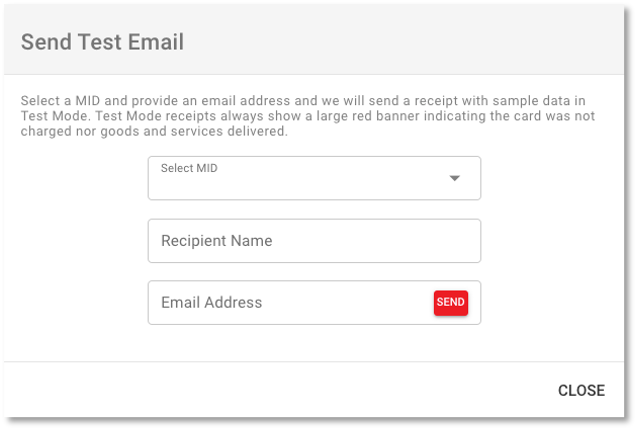
In the example above, do the following to get a test receipt emailed to you.
- Select your MID if you have more than one.
- Enter the test Recipient’s Name
- Enter the test Email Address where you want the test receipt to be sent.
- Click on send to fire off the email.
- When you have finished, just click on close.
- The ‘Pencil’ lets you Edit the Email Receipt form. You are presented with a forms management control page for the receipt.

- Name (and Base Template) configuration – This lets you set up the basics of the form.

From here you can set:
- Receipt Template Name – You may create more than one receipt template but they must all be named differently. Best to use a descriptive name for the receipts to help you remember why you configured each one.
- Email Subject – This is what will be inserted into the subject line of each receipt email sent out.
- ‘From’ Email Name – this is a personalized form so you may enter a person’s name or a department name. This can be your noreply@ email address.
- ‘From’ Email Address – this can be your noreply@ email address, or a specific department email address.
- ‘Reply to’ Email Address – The email address you would like the customer to contact if there are issues. Especially important if you used noreply@ in the from email address. This could be a customer care email address.
Base Template
Just below the above configuration selection on your screen within the ‘Name and Base Template’ section are the two templates you can choose to use.

To select a template style, just click on the ‘SELECT’ word at the bottom of that template. It is recommended you test your receipt with both templates to see which one best suits your needs.
Company and Contact Information
This is where you would need to choose which MID is to be used for the response to a sale transaction.

- Merchant Accounts - The MID you need to use must be selected from the Merchant Accounts List.
- Secure Forms – select which form you want to use for the receipt template from the drop down list.
Logo and Messages
The logo and message section is where you can customize the receipt form further.

- Receipt Title – Just give your receipt a short descriptive name.
- Greeting – this is the salutation and greeting statement in the email above to the consumer.
- Footer Message – this is the statement that comes after the receipt in the email.
- Company Logo – Put the URL to your company logo image you want to use for the receipt and email. You need to host your own image for this to work. So please test your logo to make sure it fits properly. I have used the Logo directly from the Company Website before, if the Logo is white, it won’t be seen in the email white space.
- Refund Policy Link – this is a link that will be in the email when clicked, takes the consumer to your on-line refund policy.
Settings and Options
The setting and options section configures the details for the transaction data to be shown to the customer in the receipt itself. It is a series on ‘On/Off’ selection sliders. Please turn on (Green) those you want to use. It’s best to give the consumer as much detail as possible in order to alleviate their need to call you with questions.

- Show Billing Address – this is the consumer’s billing address
- Show Shipping Address – customer’s shipping address
- Show Order Number – each transaction requires an order number, if your customer needs that order number in order to place a customer service call, then turn this one on. If not, then turn it off.
- Show Invoice Number – same as Order Numbers.
- Show PO Number – same as Invoice and Order Numbers.
- Show Items Sold List – this one is good to include because it helps when a dispute occurs in showing you identified on the receipt the product sold to the consumer.
- Show Account Descriptor – this is what shows up on their credit card statement for the transaction. If consumers are confused because the descriptor and your business name are different, they can at least put the two together here.
- Show Total Sale Amount – recommended
- Show Sale Balance Amount – This shows that the customer owes no more money for the product.
- Show Subtotal Amount – this is the amount of the items described above, then after this amount is the included items that go to the total sale price. If this is confusing, you can just use the total sale amount and then the following items listed below that. If you test your receipt, it will start to make sense.
- Tax Amount– this is recommended to show. Visa and MasterCard will be more understanding on disputes if the receipt includes the tax amount charged.
- Shipping Amount – this is also a good idea to show for the same reason as the tax amount.
- Discount Amount – if you are offering discounts, you can show how much was discounted here.
- Gratuity Amount – if you are including gratuities on your sales amount, it is a good idea to show that amount in the receipt.
- Fee Amounts – if you are charging the consumer a fee for the transaction or sale, then you should show them how much that was.
And with that you are done configuring your receipt. Please make sure to hit the Update Button or you will lose all your work.
When you have finished editing the receipt and you saved your work, you can send yourself a test email showing what the consumer will see. Please go up to item 1 in this section to review the test email process.
Updated 10 months ago